Select a store
Czech Republic Czech Republic
Germany Germany
Spain Spain
Finland Finland
France France
Hungary Hungary
Ireland Ireland
Italy Italy
Netherlands Netherlands
Portugal Portugal
Austria Austria
Poland Poland
Denmark Denmark
Sweden Sweden
Ga door
Buy now, pay later
Buy now, pay later

Enjoy your Lightswing® right away

30 days to change your mind

So you have time to think about it

 Order before 4pm for same day shipping
Order before 4pm for same day shipping

We'll prepare your order the same day

Loading cart...

Do you want to move your light fixture? Find out how!

There’s nothing more frustrating than having a light fixture in the wrong place, and moving it can be quite a hassle. Simply adjusting your hanging lamp often takes more time than you’d expect. In this blog, we explain a couple practical solutions so that your lamp will hang exactly where you want it to.

Want more bright fixes for everyday lighting struggles? Get monthly inspiration and smart tips from Lightswing®

Hiring an electrician

An electrician can move the light fixture to the desired location. This involves adjusting the wiring, which may mean opening up walls or ceilings. It’s a reliable solution, as a professional ensures everything is done safely and according to regulations. However, it can be time-consuming and costly, and there may be repair work needed on the walls or ceiling after the installation.

black lamp hanging without a lightswing above a dining table

Using a cable duct

Another option to move your light fixture is to use a cable duct to guide the wiring from your current light point to the desired location. This is a less invasive solution compared to hiring an electrician, as you won’t need to drill into the walls or ceiling. You can attach the cable duct along the ceiling or wall, neatly concealing the wiring. However, the downside is that it may be less visually appealing, depending on how the cables are hidden and the room’s interior design.

Extension cord and hook

A simple and affordable solution is to use an extension cord and hang the lamp on a hook at the desired location. This can be particularly useful in spaces where aesthetics are less important, such as garages or workshops. While this is a temporary and not always the most visually appealing option, it can be implemented quickly without making major changes to the interior.

black lamp hanging without a lightswing
lightswing twin matt white in a dining room

Move your light fixture with the Lightswing®

The Lightswing® is a sleek suspension system for pendant lamps, available in three versions:

  • Lightswing® Single: For one pendant lamp. Easily reposition your light fixture, ideal if your ceiling point isn’t centered or if you want flexibility in your layout.

  • Lightswing® Twin: For two pendant lamps. Offers the same freedom as the Single, perfect for rotating tables or shifting zones.

  • Lightswing® Zero: Designed for linear or bar pendant lights. A fixed model that gives you the clean, centered look, exactly where you need it.

All three ensure your lighting always aligns with your interior, no matter how often you change things up.

If you would like to know if your ceiling is suitable for our Lightswing®, you can check that out: here

Changing your pendant light has never been easier with the Quick Release

Are you looking for a stylish solution to easily swap out your pendant lights? With the Lightswing® Quick Release, it’s now possible. This smart addition to the Lightswing® allows you to effortlessly adjust your lighting without any tools or hassle. Whether you want to refresh your interior or simply adjust the lamp for a special occasion, the Quick Release makes it easier than ever.

What is the Quick Release?

The Quick Release is an essential component of the Lightswing®. It is a coupling piece that allows you to easily attach and remove pendant lights. The Lightswing® Single comes with one Quick Release, while the Lightswing® Twin comes with two Quick Releases. Effortlessly slide your pendant light in and out of the end of your Lightswing® and experience the flexibility.

Changing pendant lamps with Quick Release

How does it work?

Using the Quick Release is surprisingly simple. Slide the coupling piece in or out of the end of the Lightswing®, regardless of whether a lamp is attached or not. Want to remove or replace the lamp? No problem! Remove the Quick Release from the Lightswing®, loosen one screw of the strain relief, and remove the other screw completely. This allows you to easily thread the lamp’s cord. Then, attach the wires in the terminal block, tighten it, and secure the strain relief back in place.

Want more styling tricks and smart tips for switching up your pendant lights? Sign up for monthly inspiration straight from the Lightswing® community. 

Tip

Want to make switching between your favorite pendant lights even easier? Consider purchasing an extra Quick Release. This way, you only need to mount your lamps to the Quick Release once, and then you can effortlessly swap them out afterward.

Discover the Quick Release

Unlock your Lightswing® with the  – Block release

Is your Lightswing® no longer rotating? Then your Lightswing® has gotten stuck in the spin-through protection. You can get the Lightswing® loose by turning it the other way. But which way was that again? We have created a handy tool for you so you can enjoy flexible pendant lights again in no time.

Want more helpful tools, updates and smart lighting tips? Join the Lightswing® newsletter and stay ahead of the curve before problems pop up.

Why doesn’t my Lightswing® rotate anymore?

To prevent damage to the cords of the Lightswing®, it comes with a spin-through protection. This is activated when the Lightswing® is repeatedly turned in the same direction when being moved. Over time, this can cause the Lightswing® to become completely stuck.

Here’s how to solve it!

Using the Block Release, you can easily rotate your Lightswing® freely again. In the PDF below you will find the Block Release with simple instructions. Print it out and follow the steps carefully to quickly enjoy your flexible pendant lights again.

Still stuck?

Can’t get the Lightswing® moving again using the Block Release? Our support team is ready to help you get things moving again. Whether you need a little extra guidance or want to ask your question directly we’re just one click away.

Sustainability: this is how Lightswing® contributes

At Lightswing®, we believe in design with impact. Not just on your interior, but also on the world around us. That’s why we make conscious choices from materials to packaging and transport.

This is sustainability.

Sustainability is all about balance: between people, the environment, and the economy. Or, as it’s often put: People, Planet, Profit. At Lightswing®, we don’t translate this into empty words, but into real choices. We look for sustainable solutions that fit within our design DNA without compromising on quality, style, or experience.

This is what Lightswing® does in the field of sustainability.

Lightswing® contributes to a more sustainable world by making conscious choices at every step. The Lightswing® itself is 100% recyclable, our packaging is completely free of plastic and made from FSC-certified cardboard, and each Lightswing® is delivered in a reusable black fabric sleeve.
The shipment of the Lightswing® ensures less CO2 emissions than faster, but less sustainable alternatives.

Want more bright updates on design and sustainability? Sign up for our monthly newsletter and discover how small changes can light up the bigger picture.

Sustainable package Lightswing

The Lightswing® packaging

Unboxing your Lightswing® should feel just as refined as the product itself. That’s why we’ve completely reimagined the way we package it. Where you once found small pieces of plastic, you’ll now see FSC-certified cardboard boxes protecting the mounting ring and cover plates. And the Lightswing® itself? It comes neatly wrapped in a sleek black fabric sleeve.

This sleeve not only protects your Lightswing® during transport it’s designed to be kept and reused. Perfect, for example, to store cables neatly or to keep your tools together. A small but smart detail that makes the Lightswing® experience even more sustainable.

Shipping

Lightswing® products are transported to the Netherlands by sea. This takes a little longer than air or road transport, but it significantly reduces CO₂ emissions. With smart planning and careful stock management, we make sure there are always enough Lightswings® available so you can enjoy your order without unnecessary waiting.

Shop Lightswing®

Attach a pendant light to an ornament

In both old and new homes, ceiling ornaments or rosettes are common and often positioned in the center of the room, making them ideal for hanging a beautiful pendant lamp. However, what if the center isn’t where you want your lamp to hang? No worries! The Lightswing® suspension system allows you to hang your lamp adjacent to the ornament without any dangling cables or messy finishes, preserving the neat appearance of your space.

Love timeless tips for stylish interiors? Get monthly inspiration delivered straight to your inbox—real homes, smart solutions, and a touch of design magic.

Installation Process:

Securing the Lightswing®:

  1. Mounting Ring Attachment:
    • Begin by attaching the mounting ring directly to the ornament. This ring serves as the anchor point for the Lightswing® and ensures that the system maintains a safe distance from the ornament, preventing any potential damage.
  2. Lightswing® Setup:
    • Attach the Lightswing® to the mounting ring installed on the ornament. This setup not only keeps the pendant light stable but also allows for easy adjustments along the circumference of the ornament, giving you the flexibility to position the light precisely where you need it.
Lightswing and pendant lamp hanging from an ornament on the ceiling

Enhancing classical charm with modern functionality

Ornamental focus: A ceiling ornament enhances a room with a touch of classic and romantic aesthetics. By utilizing the Lightswing® to hang a pendant light, you not only spotlight this ornamental feature but also blend traditional charm with contemporary design, creating a luxurious focal point that commands attention.

Functional elegance:

Versatile placement:

  • The Lightswing® system’s versatility means you can position your pendant light not just beside the ornament but anywhere within a 93 cm radius from the attachment point, all without compromising the room’s aesthetic or dealing with unsightly cables.

Aesthetic and practical benefits:

  • Opting for the Lightswing® allows you to highlight the room’s classic elements while achieving the exact lighting placement you desire. It’s the perfect solution for those who appreciate the elegance of traditional decor but require the practicality of modern design.

Discover more:

Explore the possibilities with Lightswing® and learn how effortlessly you can enhance your room’s design while focusing on functionality. Whether it’s spotlighting an antique rosette or optimizing light placement in your living space, the Lightswing® offers a sophisticated solution to interior lighting challenges.

Discover here wich lamps are suitable for your Lightswing®

Discover Lightswing®

How to attach a lamp to the Lightswing®

Hang a pendant light in seconds. This is possible with the Lightswing® on your ceiling. Huh? Yes, really! You’ll never be messing around in the air hanging a lamp again. And that saves time and annoying situations.

Attach a lamp with Quick Release

After the Lightswing® hangs, attach the lamp to the Quick Release. This Quick Release is an intermediate piece that you can easily click into the Lightswing®. And as the name ‘Quick’ says, attaching your lamp to the Lightswing® is nice and fast. Handy, right?

Discover the Quick Release
Behind the scenes of a Lightswing photoshoot with the lightswing employees

Hanging the Lightswing®

First things first. To be able to hang a lamp without difficulty, it is useful to attach a Lightswing® to your ceiling. Then you can use this hanging system for pendant lights – with one click! – hang a new lamp. Curious how that works exactly? Read on!

Want more step-by-step tips to make lighting easier? Get our monthly bright ideas deliverd straight to you.

Attach your cord to the Quick Release

You can ‘mount’ your lamp to the Quick Release while sitting at the kitchen table. That saves fumbling on the stairs with your hands full of tools. In the step-by-step plan below you can read how attaching the lamp to the Quick Release works:

  1. Collect all the stuff you need. These are: a suitable pendant lamp for the Lightswing®, the Quick Release, a marker / pencil, scissors / cutter, a stripping pliers and a fitting screwdriver.
  2. Decide how high you want to hang the lamp. For the height of a lamp above the dining table is recommended in most cases 75 cm. Mark this point on the cord of your pendant lamp.
  3. Cut the cord of the lamp 10 cm above the mark.
  4. Using the stripping pliers, strip the outer sheath of the cord about 4 cm, so that the coloured power wires become visible.
  5. Using the stripping pliers, strip the end of the coloured threads so that 1 cm of copper emerges.
  6. Unscrew one screw of the Quick Release looser and remove the second screw completely.
  7. Connect the wires to the connector in the Quick Release.
  8. Tighten the two screws of the Quick Release again.

Watch the video  ‘attaching a lamp cord to the Lightswing®‘ to see what the above steps look like.

Hang up your lamp or temporarily remove it with one click!

Have you attached the lamp cord to the Quick Release? Beautiful! Then it’s time to hang your lamp on the Lightswing®. This time with a lamp, go up the stairs. Hassle with wires and screwdrivers is no longer an issue. You slide the Quick Release into the end of the Lightswing® and voilà: your lamp hangs!

Do you want to temporarily remove the lamp because it hangs in the way? That too is quickly done! Disconnect the Quick Release from the Lightswing® and store your lamp. Shop your Lightswing® now!

Want to see more clever hacks like this? Join our circle of bright thinkers and get monthly inspiration straight from Lightswing®.

I am text block. Click edit button to change this text. Lorem ipsum dolor sit amet, consectetur adipiscing elit. Ut elit tellus, luctus nec ullamcorper mattis, pulvinar dapibus leo.

When should the Lightswing® mounting ring be used?

During the assembly of the Lightswing® you must make a choice whether you use the mounting ring or not. Curious when you use or do not use the mounting ring when mounting the Lightswing®? We explain it to you in this blog.

product picture of extra mounting ring set with leveling foot black

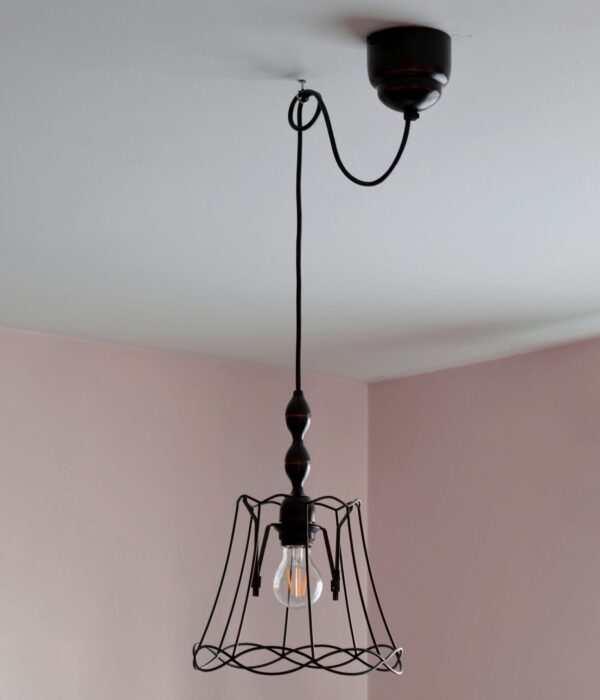
Mounting location of the Lightswing®

Whether or not you should use the mounting ring depends, among other things, on the place where you want to attach the Lightswing®.

Lightswing® over a central box

If you want to attach the Lightswing® to the place where the current central box is located, you do not need the mounting ring. The Lightswing® can be mounted tightly to the ceiling. The electricity cables and crown stones can easily be hidden in the central box.

Lightswing® over a cable from the ceiling

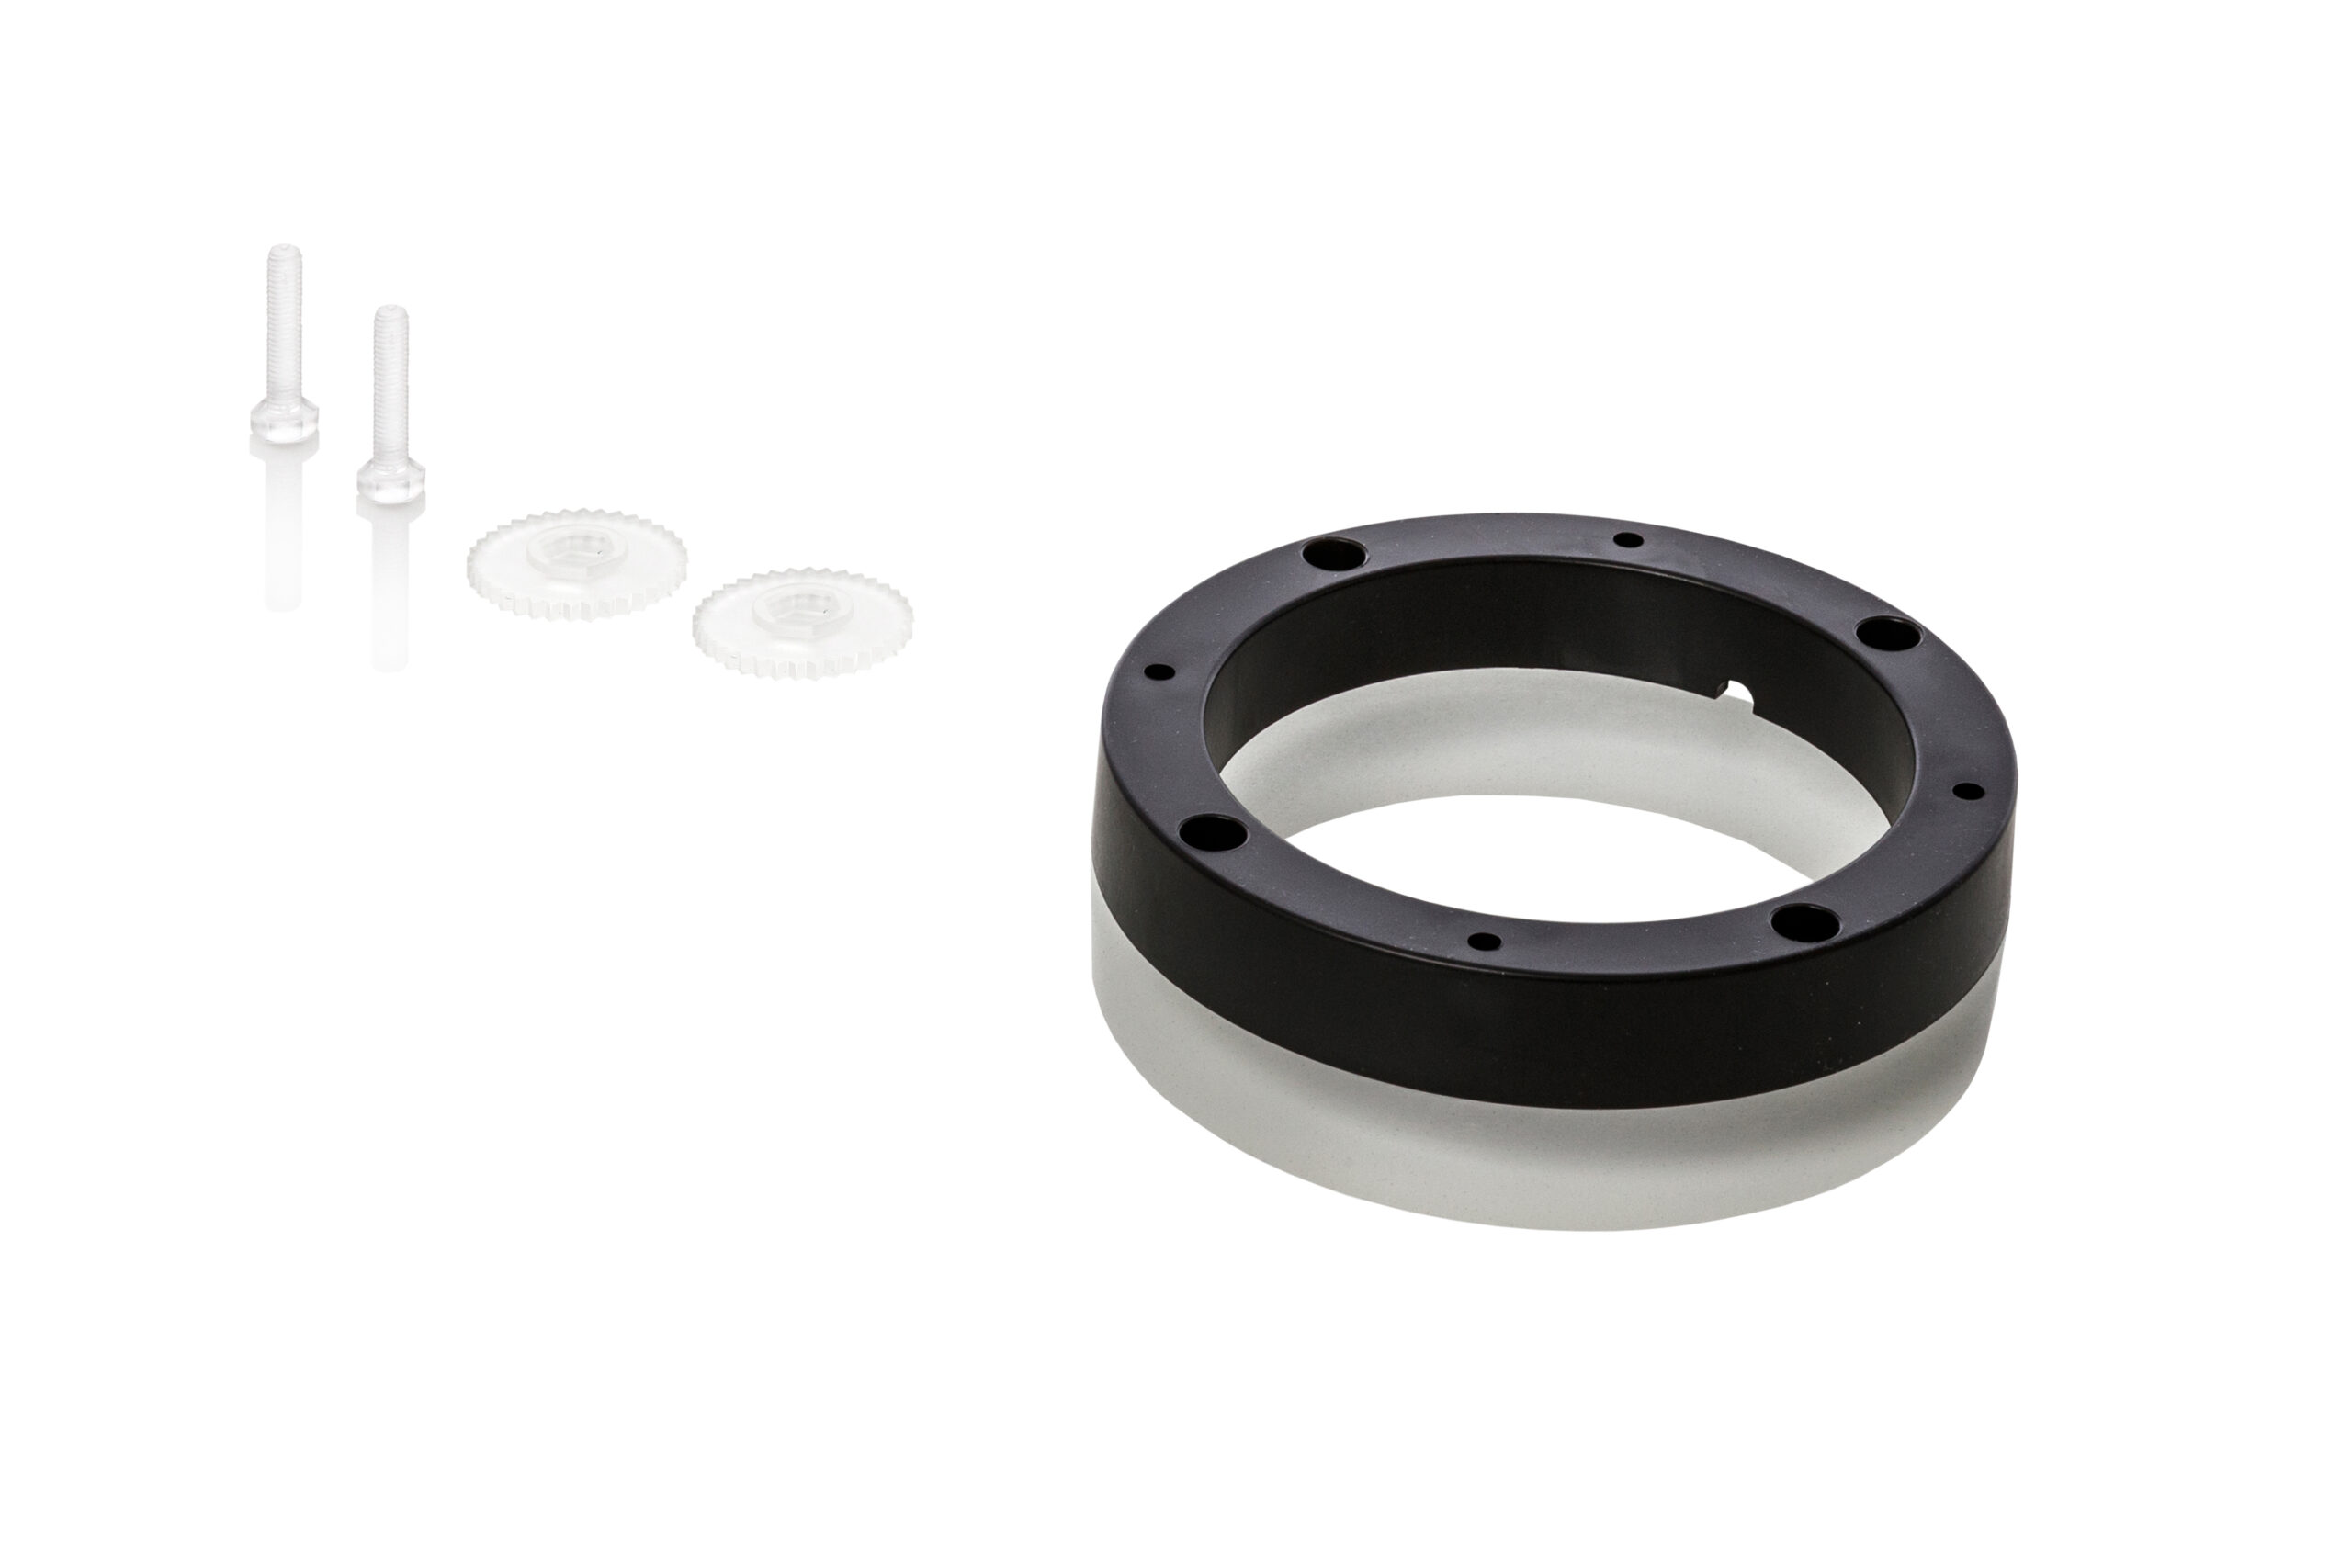
Do you not want to mount the Lightswing® suspension system over a central box, but on a separate electricity cable from your ceiling? Then you do need the mounting ring. The mounting ring is needed so that you can cleverly hide the cable from the ceiling. There is enough space for this in the mounting ring. You then screw the Lightswing® against the mounting ring.

Lightswing® anywhere

Do you mount the Lightswing® anywhere on your ceiling where there is no light connection yet? Even then, the mounting ring is needed. In the mounting ring there is a small recess that you can push out of the mounting ring. For example, you can pass an electrical wire through the mounting ring. Then connect the Lightswing® to the electricity cable and screw the suspension system to the mounting ring.

Want more smart installation tips and tricks? Get our monthly bright ideas straight to your inbox making mounting easier than ever.

Lightswing single black diningroom pink
Lightswing Single white in a luxury dining room

Ceiling to which the Lightswing® is attached.

In addition to the mounting spot, it is also important to check whether your ceiling is straight and whether the finish of your ceiling lends itself to a Lightswing® without or with a mounting ring.

Straight ceiling

When you attach the Lightswing® to your ceiling without the mounting ring in between, the Lightswing® is tightly mounted against the ceiling. Does your ceiling slope a little bit or is your ceiling not completely straight here and there? This can cause the Lightswing® to not slide optimally. When you place the mounting ring between the ceiling and the Lightswing®, there is 2 cm between the Lightswing® and the ceiling. For example, it is not a problem if the ceiling is slightly uneven where the suspension system will hang.

Ceiling finish

Often ceilings are nice and sleek and evenly finished. With such a sleek finish, it is often not necessary to use the mounting ring. Depending on where you attach the Lightswing® of course. Do you have a packed ceiling at home? Then it can be nice to mount the Lightswing® with a mounting ring. This way you can be sure that the Lightswing® does not rub along your ceiling.

Whether or not to use the mounting ring depends on where you attach the Lightswing® and on the ceiling to which the system is attached. Would you like to know more about the Lightswing® mounting? Check out our assembly page.

Shop Lightswing®

How high should a pendant light hang above the dining table

Have you bought a new dining table pendant light and are you curious how high a pendant light should hang above the dining table? There is a rule of thumb for this, but the height of your dining table pendant light also depends on the type of pendant lamp and the size of the pendant lamp. We’ll tell you everything you need to know in this blog.

Want more bright lighting tips like this? Get a monthly spark of inspiration to make your interior shine.

Yes, inspire me!
Stylish Lightswing twin matt black above dining table

Rule of thumb for pendant lights above the dining table

The height of the lamp is the most important thing to consider when hanging a pendant light above the dining table. The rule of thumb for a lamp above the table is 75 cm. The distance between the tabletop and the bottom of the lamp is 75 cm. However, this is not always the ideal height. Because what if the pendant lamp only illuminates a small part of the table? Or does the lamp not give good light at all, so you do not see what is on your plate in the evening?

A open or closed pendant light above the dining table

First, make a conscious choice between an open or a closed lampshade. A pendant light above the table with an open lampshade provides atmospheric lighting throughout the room. That is ideal when you have a large kitchen. When you choose a closed lampshade, you can centre the light much better in one place. The light then shines on the kitchen table and less to the rest of the room. In this case, hang your lamp a little higher, so that you can illuminate a larger part of the table with the same lamp. 

Size of the pendant lights above the table

You can choose a pendant light in varied sizes, colours and shapes. How high you hang a pendant light above the dining table also depends on the size of the pendant light. Smaller pendant lights can often be hung a little lower above the table. That is, about 55 cm above the table. With larger lamps, it is wise to stick to the rule of thumb of 75 cm. Are you hanging multiple lamps above the dining table? Make sure the distance between the lamps is at least 80 cm. 

Do you simply want to hang two pendant lights above the dining table? With the help of the Lightswing® suspension system you can easily hang two lamps above the table. Curious?  Discover the Lightswing® now. 

Shop Lightswing®